Thursday, October 30, 2014

The Daddy Quilt

The Daddy Quilt...

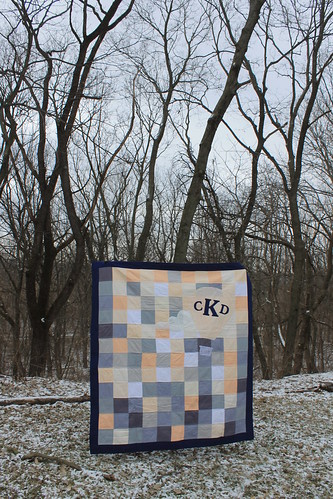
Rowan's first quilt. Colors and (most of the) fabrics picked by Daddy, layout completed by consensus, everything else done by Mommy. Originally there was going to be a Mommy Quilt as well. The fabric was cut, so maybe down the road sometime.

  • Crib size (28x52-ish)
  • Basic patchwork
  • Machine pieced and quilted
  • Completed in 2014
  • Lives with me 
  • Fabric includes some Moda (not sure of artist), some Tula Pink, and some unknown. The orange-salmon fabric with white tallships on it was Leland's shirt in a previous life.
6 months pregnant

When I was putting this quilt together, I wanted the quilt to have a classic feel and I wanted to follow my basic kid quilt rules: comes together quickly, and nothing too fiddly. More seams = more opportunities to come apart, especially for something that's going to get washed multiple times. And not overly baby-ish. I wanted the quilt to be able to age up at least to some degree - to still be acceptable as a five year old's blanky.

I was drawn to simple patchwork squares. This design showcases the fabric, it's simple, timeless, and easy.

Inspiration

Basic patchwork is a chameleon that can be anything depending on the fabric choices.

Delicate and sweet...

Pretty By Hand


Chic and modern...

Waterpenny Quilts

Cheerful and sophisticated...

Red Pepper Quilts

And so on. For this quilt, Leland picked the colors and selected two or three fabrics; I filled in the rest. Neither of us wanted this to be a traditional pink-explosion "girl" quilt. I love the colors - teal, orange, and brown - and also love how the fabric shows off some of his favorite things, namely bicycles and the ocean.


We played around with the layout for a while before hitting on this arrangement, creating a secondary pattern out of the individual colors. It needed something more, so I added that single yellow square in the bottom corner. I love it.


I've gifted my share of baby quilts at this point, and I wasn't sure exactly how much use they got while the baby was small. But to my delight, we use the quilt all the time. The size is versatile and the weight is perfect for play and sleep. She's snoozing under it at this very moment. We use it for tummy time, naps, as a picnic blanket, and for growing up so fast *sniff*.


Tuesday, October 14, 2014

Twin Set


Stats
  • Name: "Twin Set"
  • Completed 2014
  • Baby+ size, about 36x36 (the two quilts are slightly different sizes)
  • Machine pieced (both)
  • Machine quilted (both), hand-tied (girl's quilt)
  • Baby gifts!
When my dear friend told me she was pregnant with boy-girl twins (!) I leapt into action. Ok, I waited until she was in her second trimester, then bought some fabric and then let it sit around for a while, then finally got around to actually putting something together after realizing that twins rarely go full-term.

Inspiration

I wanted to make coordinating quilts that weren't too "boyish" or "girlish". I also wanted to ensure that both kids would still like the quilts once they got old enough to buy into the social construct of gender, which meant an avoidance of too-girly patterns or colors for the boy quilt in particular. A good way to coordinate the quilts was to use the same fabric for each, and I love the currently-trendy yellow/gray/white combination (for instance, the sampler quilt below by Kati [From the Blue Chair].

Kati - From the Blue Chair

I wanted also to choose blocks that looked fancy but came together fast. I succeeded for the boy's quilt by picking the bento box block. This block is very easy to make, and has a neat geometric quality that I felt was decently masculine. It's a modern block, obviously based on the Japanese bento lunch box with its cute little divided sections for each food.

Bento Box: Diane AZ - Desert Colors
For the girl's quilt, I selected the great-granny block, something I've wanted to make for a while. The block cannot possibly be new because it's so blindingly simple (most variations of sewing fabric together have already been invented during quilting's looooong history as a craft), but this incarnation is named after crocheted granny squares. The quilting variation is often set on point. The block feels sturdy, yet sweet and somewhat old-fashioned. A nice square for a girly sort of quilt.

Great-Granny: Lori Holt - Bee in My Bonnet
Great-Granny: Emily - Simple Girl, Simple Life

In Progress

Unfortunately, I neglected to consider that sewing all those tiny little squares together for the great-granny squares would take a long (duh) time. I should have realized this because I had just finished a similar quilt, but oh well. This meant that the boy quilt top was completed in a couple days, but the girl quilt top dragged on and on. Though it was worth it in the end, because I love the finished product! (Also I love my friend and her sweet babies!)

I also ran into an issue when quilting. The boy quilted up like a dream, but the girl not so much. The fabric shifted to the point where I had large gathers in the fabric that were creating inadvertent, ugly pleats in the top. This may be because I basted the girl quilt a couple weeks later than the boy quilt, and in the meantime my own pregnant belly had made it much more uncomfortable to crawl around on the floor. So probably I didn't do quite as good a job getting the fabric in the girl quilt smooth as I pinned it. I pouted for a bit about this, then did just a couple passes of machine quilting to anchor the girl quilt sandwich, and hand-tied it to finish. In the end I really liked the effect, traditional and sweet to match the great-granny block.

I bound the boy quilt in blue and the girl quilt in a wine color, in a nod to the traditional blue vs. pink.


This is what my labels look like - I use an archival-quality pen to write them. They do fade a bit with washing (all of my quilts are machine washable) but remain legible.


Final Product

I love how these came out. They go together but are also individuals, just like a set of twin babies! And I love getting photos of the quilts in use for tummy time or cuddles. Honestly, I make quilts to be used. It's one reason why I enjoy quilting more than things like embroidery or cross-stitch: the final product is functional.

(Obligatory photo of Fletcher on the quilt)


Thursday, October 9, 2014

Small Things

I want to keep a record of some of my quilting and embroidery pieces. Here's the first one I've chosen, Small Things.
 

Specs:
  • Wall hanging
  • 17x17
  • Completed 2013
  • Hand embroidery in center; double circles in center attached by hand
  • Machine pieced and quilted
  • Many fabric pieces come from a mystery box donated to the Greenville Quilt Guild after the previous owner passed away. There's also some Moda (not sure of the designer) and Denyse Schmidt for JoAnn Fabrics. The background fabric used to be a body pillowcase.
  • Currently this lives with me, hanging above my sewing table.

Goals:
  • Practice embroidery and using tissue paper to transfer patterns onto dark fabric
  • Practice sewing curves
  • Make a Dresden Plate block, a traditional block inspired by the colorful Dresden porcelain plates produced during the 19th century when Dresden, Germany was a center of the romanticism art movement. The origins of the block are in the late 1800s, and it was also very popular during the 1920s and 30s.
  • Use patterned fabric with rich, vibrant colors that don't match but also don't clash
  • Make something pretty!
All goals were met, at least in my opinion!

Inspiration

I used the (free) embroidery pattern from Amy Sinibaldi [Nana Company], and the (free) tutorial from Elizabeth Hartman [Oh Fransson] posted on Sew Mama Sew (free is a theme with me). Color inspiration came from the deep, complex, and vibrant esthetic of Holly DeGroot [Bijoux Lovely]. I followed Amy's pattern pretty much exactly, but used satin stitch to fill in the leaves.

Oh Fransson via Sew Mama Sew


Nana Company


Bijoux Lovely


In Progress...


The quote is from Mother Theresa.


The fabric pull was pretty easy and came together rapidly. I cut two of each fabric and placed them on opposite sides of the circle; and also tried to space out similar colored fabrics. For example, the two grey fabrics are spaced at 12 and 6 o'clock (dark grey) and 3 and 9 o'clock (light gray). Many of the fabrics were fussy-cut to feature particular images (the little bee!) or to frame the image within the spoke. I chose the background fabric several weeks after the rest of the fabric - it's not a neutral, which I love.
 
 Things I Learned
  •  Always read the directions carefully. Twice. Maybe three times. 
  • When you cut something too small, you can always slap on a white circle to cover the gap between the grey circle and the plate, and pretend that you planned it that way from the beginning.
  • When embroidering in public, people may ask what you are "knitting". Close?

And the Final Product...